Post this workshop (3–4 hour long) you will have a working face detection & recognition model using OpenCV. You can go through the components of code or jump directly to environment setup.
Problem Statement
- First, we have to detect a human face from digital image
- Second, recognize to whom detected face belongs to.
Folder Structure
Initially you should have these files/folders (available here on GitHub)

Environment
- Install latest version of Anaconda from here. Simply download & install it (add environment variable when prompt).
Optional step- Create another environment apart from base/root environment (that comes with default installation of anaconda), this will isolate newer environment from the base for this workshop.
- Once anaconda is installed its package manager conda can be used to install pillow, opencv, like
conda install pillow. Steps to use conda are here.

- Install jupyter-lab using command prompt (& conda) or you can use any python editor of choice like

- Full dataset here (172 gb), My laptop couldn’t handle the entire dataset so, using a subset of entire dataset uploaded here on google drive. Prediction done on
test_file.avii.e. Alexandra Daddario Interview.

Dataset (9 celeb)
- Github repository here
Basic Components
Let us understand some basics first
Playing Video from File– First we create VideoCapture object & give the location of video file. cap.isOpened() checks whether camera capture has initialized or not, it return value True . cap.read() keep giving value True till camera frames are read correctly. frame gets the next frame from video file & ret get the return value from camera either true or false. cv2.waitKey(1) is for delay, smaller values like 1 will make video run very fast. Going forward, I found value of cv2.waitKey(30) to be okay. cv2.cvtColor() convert captured frame to grayscale (why ? …covered below). cv2.imshow() display grayscale video.
cap = cv2.VideoCapture('test_file.avi')while(cap.isOpened()): ret, frame = cap.read()gray = cv2.cvtColor(frame, cv2.COLOR_BGR2GRAY)cv2.imshow('frame',gray) if cv2.waitKey(1) & 0xFF == ord('q'): break# When everything done, release the capture cap.release() cv2.destroyAllWindows()
Haar Cascades- Object detection refers to detecting instances from a particular class like human face, cycle, animal, car or kite etc. Object detection using Haar feature based cascade classifier was first proposed by Paul viola & Michael Jones in 2001. Here we are using it to detect faces. Another approach to detect faces is by using a HOG classifier (It is part of upcoming workshops)
OpenCV comes with many pre trained classifiers for detecting face, eye, smile etc. First we need to load the required XML classifier. I have moved the XML file (haarcascade_frontalface_alt2.xml) from its default location in OpenCV installation to a folder in our srcproject folder.
#load haar classifier
cv.CascadeClassifier('haarcascades\haarcascade_frontalface_alt2.xml')
Region of Interest- ROI allows us to work on a rectangular subset of image without altering the entire image.
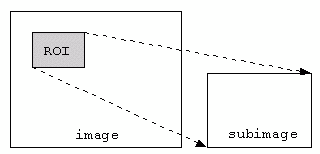
Coordinates of parameter roi starts from top left corner. detectMultiScale() detects objects of different sizes in input image, if faces are found it returns the position of detected faces (x,y,w,h) . Scale factor 1.5represent image size reduction at each scale. Minimum neighbour 5 Parameter specify how many neighbors each candidate rectangle should have to retain it, higher value results in less detections but with higher quality. Value of x,y,w,h from detectMultiScale() is used to create region of interest.
faces = face_cascade.detectMultiScale(gray, 1.5, 5)
    for(x, y, w, h) in faces:
        #print(x,y,w,h)
        roi_gray = gray[y:y+h, x:x+w]
        #roi_color = frame[y:y+h, x:x+w]
Working with Training data– Training data is in a folder named Images, label of the image is the name of the folder like Alexandra Daddario. We are walking through all the images in Image folder or directory using os.walk(), finding files that end with png and jpgextensions. Also we are extracting & converting folder names to lowercase and replacing spaces " " , underscore_ with dashes- . In computer graphics, antialiasing is a software technique for diminishing jaggies — stairstep-like lines that should be smooth. We resize (improves confidence of model) the image, apply anti alias & load the images into a numpy array using np.array() … computers understand only numbers.
for root, dirs, files in os.walk(image_dir):
    for file in files:
        if file.endswith("png") or file.endswith("jpg"):
            path = os.path.join(root, file)
            label = os.path.basename(root).replace(" ", "-").replace("_", "-").lower()
            #print(label, path)
            if not label in label_ids:
                label_ids[label] = current_id
                current_id += 1
            id_ = label_ids[label]
            #print(label_ids)
            #print(id_)

            pil_image = Image.open(path).convert("L") # Using Pillow mode "L" to convert image into Grayscale
            size = (550, 550)
            final_image = pil_image.resize(size, Image.ANTIALIAS)
            image_array = np.array(final_image, "uint8")
Recognizer– We are using Local Binary Patterns Histogram (LBPH) algorithm for facial recognition. LBPH is a powerful algorithm in the field of texture classification.
# Creating LBPH object
recognizer = cv.face.LBPHFaceRecognizer_create()
# Training it on data(x_train) & labels y_labelsrecognizer.train(x_train, np.array(y_labels)) recognizer.save("trained_model.yml")
Here we are predicting on the captured roi from video file followed by putting a rectangle over recognized face. putText() will display the predicted name over recognized face.
# Predict on the captured video
id_, conf = recognizer.predict(roi_gray)
        if conf >= 45 and conf <= 85:
            #print(id_)
            #print(labels[id_])
            font = cv.FONT_HERSHEY_SIMPLEX # Display name font
            name = labels[id_]
            color = (255, 255, 255)
            stroke = 2 # Thickness
cv.putText(frame, name, (x,y), font, 1, color, stroke, cv.LINE_AA)Displaying rectangle over detected face with
cv.rectangle()color = (0, 255, 0) #BGR stroke = 2 end_cord_x = x + w end_cord_y = y + h cv.rectangle(frame, (x,y),( end_cord_x, end_cord_y), color, stroke)
Try it out !!
Train the model by running face_recognition.py

Followed by face detection on test_file.avi

Reference:
- OpenCV documentation video capture, haar cascade classifier
- Rapid Object Detection using a Boosted Cascade of Simple Features here
- Viola–Jones object detection framework here
- Coding for Entrepreneurs github
- Histograms of Oriented Gradients for Human Detection here
- Face Recognition with Local Binary Patterns here & here.
If you have any doubt, comment or question, then do write it in the comment. To see similar post, follow me on Medium & Linkedin. If you enjoyed then Clap it! Share it! Follow Me! Thanks !!
Join Discussion
5 Comments
Pretty! This was a really wonderful article. Many thanks for providing this info. Constance Ezri Twelve
Major thanks for the blog. Much thanks again. Want more. Estrellita Heall Noelle
Terrific article! That is the type of information that are supposed to be shared around the internet. Keri Gorden Chaffee
I am no longer positive the place you are getting your info, but great topic. I must spend a while finding out much more or working out more. Thank you for magnificent info I was looking for this info for my mission. Felicia Zaccaria Shuler
Im thankful for the blog post. Much thanks again. Cool. Malissia Eddy Shaughnessy
Your Comment
Leave a Reply Now